This is not a sponsored post. I just love using my Silhouette Cameo!
After Christmas I bought a pack of battery powered lights, thinking I’d do the classic frosted/vinyled glass block craft and put that on my mantel, but I remembered I had downloaded the free shape of the week last year from the Silhouette Design Store, and decided to tackle that 3D project instead. I followed their instructions to a T and was able to assemble to Heart Marquee with success! It looks so snazzy lit up.
Inspiration Mantel from the Silhouette Blog
I loved the grouping of frames with the marquee on the Silhouette blog post, so I decided to try to replicate it with the frames I had on hand. I cut out the quatrefoil out of matte black wall vinyl after measuring my 11 x 14″ floating frame and transferred it to the glass with transfer tape.
I downloaded a grey pinstripe digital background paper from a store on Etsy and printed it out on my printer instead of running to the craft store for one piece of paper. Then I cut out the XOXO with Silhouette’s double-sided adhesive and sprinkled black glitter on it. Â Totally beats working with wet glue + glitter! Viola! The look, recreated! I had an extra shadowbox frame, so I put the Run away with me in it (it was in the floating frame last year from a project inspired by the Beautiful Mess gals.)
Inspiration from A Beautiful Mess
I wanted to make a Valentine’s themed throw, so I  cut out the Love Stack image from the Silhouette Design store out of heat transfer vinyl, and cut out white for the background (offset/outline) and gold for the lettering. I’m chuffed about how it turned out! I picked up an 18×18″ pillowcase I found in the clearance section from Hobby Lobby ($3.49) and pillow insert with the same measurements, and my throw was complete in under 30 minutes!
Do you decorate for the holidays? I’d love to see it! Leave your decor link in a comment below!
I’m crazy about clipboards. I use them ALL the time for everything! I hang art from them and put calendars on them. Every project gets a clipboard. While I don’t mind the brown chipboard that they come in, I have been wanting to dress some up, so today I present to you, my clipboard chalkboard to-do list!
*Some of the following are affiliate links. Â Thanks for supporting this blog!
I bought a 24 -pack of clipboards on Amazon (you remember I use these for everything right?) but I saw them at Dollar Tree the other day, Cricut Chalkboard vinyl & a chalkboard pen from Joann’s and put this together!
First I measured my clipboard and drew it in Silhouette Studio. I like to do this step so I can have an idea of how my project will turn out + to gauge how much material I will need to cut out. I do this step for most projects, actually.
I downloaded a rectangle scallop shape from the Silhouette Design Store here. I right-clicked and ungrouped the planner project shapes and dragged the scalloped rectangle shape over to the clipboard and clip I had drawn.
I hadn’t worked with this material before, so IÂ went with the default vinyl cut settings in the software with my blade on 2. That didn’t seem to cut all the way through, so I left it in the machine and re-cut it and changed my blade to 3.
The chalkboard vinyl material was 12″ wide, so I *could* have left it on the roll and cut it without the mat, but you lose cutting area on the left and right border if you cut it without a mat as shown. The red line is the cut border. It’s hard to see in the cutting with a mat picture. If I hadn’t cut it with a mat, I would have risked the left and right edges of the scallops not getting cut. So a mat was used with my Silhouette Cameo Electronic Cutting Machine.
cutting without a matcutting with a mat
I tried to apply it directly to the clipboard skipping the Transfer paper step. I got a million bubbles and wrinkles in the few inches I tried, so I stuck it back on the backing paper and got out the transfer paper and covered the vinyl completely with the transfer paper and smoothed it out with my squeegee.Â
I peeled off one edge of the vinyl from the backing, and applied it from the bottom of the clipboard and squeegeed it to the clipboard until where it met the clip.Â
I used my exacto knife to cut the vinyl to fit around the clip at the top
and smoothed out the rest of the vinyl at the top of the clipboard with my squeegee.
Viola! My Chalkboard Clipboard is complete! I’m planning on using this for home to do list items. I love the texture of this vinyl – I bought a roll of a different brand (I can’t remember which one) last January and never ended up using it because it was flimsy & just felt like regular vinyl, so I’m happy this one worked out!Â
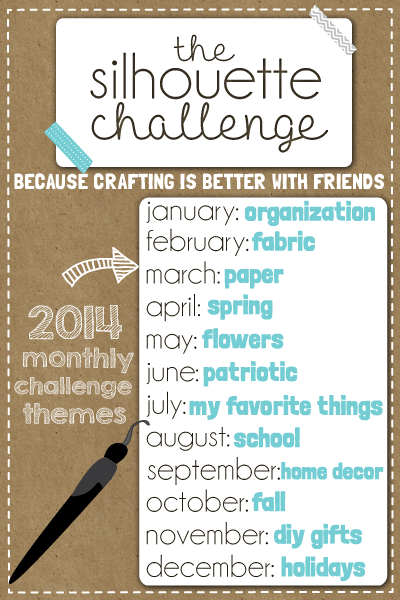
I made this project for January’s Silhouette Challenge which theme is organizing. The bonus challenge this month was to use vinyl.
Want to Check Out More Silhouette Projects?
My Silhouette Challenge buddies and I are all sharing projects on our blogs today, so peruse the projects below for a wealth of Silhouette inspiration!
Paper succulent in a geometric planter. Both designs are from the Silhouette Design Store.
I’m trying to spend more time on personal projects, with a goal of making *something* every day/do something you love every day. I made a few things with my Silhouette Cameo machine this week, but this was one of my favorites:  a paper succulent in a geometric planter.
These are a few of my crafty wishes and dreams for 2015. I love using my Silhouette Cameo machine to help get my projects done, and I’d like to get more familiar with my sewing machine.
cut
This would make a great tee or throw! I was thinking gold on black, grey or navy.
double-sided adhesive for valentine’s themed wall art – I have the background paper ready, but waiting on the double-sided adhesive Update: 12/30 the materials came in. I’ll post my valentine’s decor mantle soon.
use frosted vinyl to create an etched look on glass – I have some giant knitting needles that need a home, and I’d use an image of a ball of yarn. Also thinking about making one of these for a friend that crochets. Update: 12/30 the materials came in and I vinyled the two vases. I’m going to do a side-by-side post about etching vs using frosted vinyl.
more decorative throws for our couch either with Heat Transfer Vinyl or Fabric Stenciling Update: I made one on 12/28 and will include it in my Valentine’s Decor post
make a stamp (either with the Silhouette or a carving tool) to make my own patterned fabric for throws. I like pillows, can you tell?
make a clear glass block with lights in it Update: Lights acquired!
painted/stenciled wood sign
cut fabric with my machine for cards and wall hangings – I haven’t cut out fabric yet with my machine, so it’s something I’d like to tackle
heat transfers for tees. So many ideas and HTV purchased, but need t-shirt blanks.
chalkboards – a large piece, maybe cover some clipboards with it
sew
fabric wall hangings that I’ll probably use HTVÂ or stencil and put dowels at both ends.
curtains for the french doors sunroom with the fabric I brought back from India
gusseted makeup bag(s) with some awesome black and gold oilcloth I picked up from the Stitch Lab
bolster pillows with wood grain fabric I bought last year at Stitch Lab
In-between the holiday rush, I decorated the house a little for Christmas since we were hosting Christmas dinner at our home this year. This was the first year that I decorated… I didn’t grow up around decorated houses – my mother’s decor was more practical/utilitarian. I think the only thing we had on the wall was a calendar in the kitchen.
One of my goals for this year was to use my Silhouette Cameo (a electronic cutting machine) to help me decorate my house.
My first idea about how I’d use it was to make papercut art (flat and 3D) and frame and hang it around the house.  I also cut out some paper snowflakes, tea light holders and a small tea light Christmas village for our mantel! I also cut out a few ornaments and decorations out of cardstock. Cutting paper dulls your blade fast though, so I switched mediums – to cutting vinyl!Â
I picked up a few rolls of red and green wall vinyl, and decorated a column and above our TV in the living room with it. I also found some white window cling material and cut snowflakes and other silhouettes for my windows. Â I love that window clings are reusable, so I won’t have to cut them out again next year. They are also easier to remove than wall vinyl from glass.
At the end of the month I hosted an ornament making/decorating party. We used scrap vinyl I had on hand to decorate ornaments, cut a few out of paper and made a floating ornament (with a vinyled piece of acetate inside of a clear ornament). I also used vinyl to customize gift bags & tags, plus whatever else it would stick to. Overall, I’m happy with what I was able to create/decorate during the holidays with my Silhouette! I think it’s the most I’ve ever used it, so I learned a ton in the past month with very few craft disasters! I received it as a Christmas present last year and was just dying then to make Christmas decorations (but had to wait almost a year to get started!) I also practiced etching glass with a vase I picked up.Â
I’m already working on Valentine’s Day decor for my mantel! Pictures/blog post to come soon!
My duck gift bag I made with green vinyl
Christmas tree wall decal on one of the columns in my house
Our tree!
Snowflakes I cut out and the start of my tea light village
Ornament Tiffany designed
Paper ornaments I cut out
Giant gift tags as stocking labels
Giant gift tags as stocking labels
Paper tree
This was a gift tag that I blew up to 12×12″
Christmas-ween ornament? I made this for my boyfriend, who loves fuzzy cats.
The deer ornament was for the Mr’s dad.
Joni and Tiffany’s ornaments
Cindy’s ornaments
This is all layered vinyl decals above my television in the living room
I’ve been wanting to try my hand at cutting wall decals, and I thought it would be fun to use them to decorate the wall above my mantel with them for spring. We’ve had a wooden narwhal installed over the fireplace since January. (the Mister’s xmas present) Â I wanted to give him some company because he looked lonely, so I downloaded some narwhals I found at the Silhouette store and cut some out with some 12″ x 12″ Cricut wall vinyl I picked up at JoAnn’s.
Now the wooden narwhal is the king of the narwhals… Next month’s challenge is flowers! I can’t wait! I have a few ideas, so let’s see what I can come up with! I ordered 10 yards of white vinyl to play with… giant dandelions might be in the works!
Want to Check Out More Silhouette Projects?
My Silhouette Challenge buddies and I are all sharing projects on our blogs today, so peruse the projects below for a wealth of Silhouette inspiration!
Kelly & Taylor came over to cut things out on my Silhouette last week. We cut out a 3D hot air balloon and 3D umbrella I had already downloaded to hang up in her daughter’s bathroom. We used  Recollections 65 lb cardstock I bought at Michael’s and to save time, I loaded the machine up with the longer 12×24″ instead of the normal 12×12″ mat. We put 3 8.5×11″ sheets at a time on the mat, but the last sheet didn’t really like dangling/hanging off the mat – so after trying that out, we switched back to just two sheets on the mat at a time. I think if I had taped the third sheet on with masking tape it would have gone a little better.
She assembled the pieces with Elmer’s Glue and took them home to decorate. I can’t wait to see them installed! I’ll update when she sends me the pictures of them hung up!
We decided to go out the day before to beat the crowds (we have a standing date night every Friday) and we went to our favorite Ramen place in Austin, Michi Ramen. The mr pointed out that they have roasted barely tea on their super cute, illustrated menus! I asked the waiter about it because I know I love the Korean version and he wrote it out in Korean with his finger on the table and brought me out a glass! Apparently barely tea in Japan is the same thing as barely tea in Korea! He lived in Korea for one year and we talked about how the culture is very food-centered. A common greeting in Korea is  “Have you eaten? ë°¥ 먹었니? or literally translated “Rice already eaten?” It used to trip up our waiter when the neighbor in front of his house would ask him that when he was learning Korean, so he would answer, “Yes, I had chicken/noodles/whatever he had eaten” that was not rice until he learned that it was equivalent to”How are you doing?” because back 3 generations or so ago food was scarce, so it was a way to show care. The Weekly Korean has a short podcast with an explanation. I didn’t grow up with this saying because only English was spoken in my home, for the fear that I would have a Korean accent. I learned how to read and write Korean later in life. AND cook Korean food! If you’re interested in learning Korean: Timothy Ferris turned me on to Ryan Estrada’s “Learn to read Korean in 15 minutes” illustrated guide during his talk at last year’s SXSW where he was talking about his favorite tools for cooking.  I attended all the food talks during the interactive portion, of course!
I get the same thing every time I eat at Michi. The dipping ramen! It comes with a reduction of the ramen broth and thick Chinese-like noodles. I sub the thick pork slices for fishcake (kamaboko) because it’s too much for me to eat even in two sittings, which usually happens anyway. I add the ajitama (pickled) soft-boiled egg and this time I tried the pickled bamboo shoots (a win!). I usually eat all the noodles while I’m there and get some noodles to go with my “lonely broth” and have a nice lunch the next day with shredded seaweed and an egg on top.
Since we went out on Thursday, I went grocery shopping and we had our Valentine’s Day meal at home: peach & mango salsa & tortilla chips, Â lobster mac ‘n cheese, flatbread & strawberry cheesecake.
I cut out some vinyl on my silhouette to decorate the master bathroom, so this happened:
I’m terrible about figuring out something to make or give to my mister, so usually it’s a frustrating holiday for me, but I saw these hello cards in the Silhouette store and I couldn’t pass them up. I had laurels downloaded already and a script font, but for a quick click of the button, I had the image all set up and ready for cutting, so the project probably took me less than 15 minutes including installation! It’s 12″ tall  x 20″ long and I’m happy with how it turned out. He got a kick out of it, (I heard him laughing from the living room when he saw it), so I was happy, too. I cut out the matching “Hello Beautiful” and will probably put it on the mirror later this week.
I had broken my large vase earlier in the year (and just replaced it, but he was unaware, so he brought home a bouquet of roses in this neat vase that’s a longgg oval! You know I’m going to etch it, right? I’ll probably just make a stencil vinyl mask (so reverse of the tutorial in the link.)
To sum it up, this was the best Valentine’s Day that I can remember, ever! It was so good getting to spending time with friends and my mister! I love you guys!
This past Christmas, my Mister gifted me a Silhouette Cameo. To learn how to use it, I joined the Silhouette Challenge that Lauren Lanker of the Thinking Closet started. Every month you either blog or take a picture of the project you made with the machine that fits the challenge. Here are all my 2014 challenge posts so far:
This month’s Silhouette Challenge is FABRIC! I ordered some heat transfer vinyl in a bunch of colors I’m planning to use from US Cutter and it came super quick! (2 days, wow!) My first project was to customize my director’s chair (bought on amazon) for my beauty company feto soap! The fabric on it was black canvas so I decided to add white to offset the black.
I typed out “feto soap” in the Silhouette Studio software, selected the word and created an offset (the white part is the offset). I reversed everything horizontally, cut out the white section first. Then using a household iron on the cotton/linen setting (no steam) I pre-ironed the fabric for two to three seconds. You pre-iron to prepare the fabric so it can take the transfer and to get any wrinkles out. I ironed the white/offset section for about 4 seconds after eyeballing it in the center. Then I lined up the black heat transfer vinyl centered over the white, and gave each section a firm 15 second press with my body weight. Viola! Now I have a custom director’s chair to bring to shows, like having a mini banner behind my table!
The next time I heat transfer vinyl black material with white, I can just crop out a void in the software where the black is in the white so I don’t have to waste black vinyl and worry about getting it lined up just right!
My next  project for my cosmetics company will be a table runner to use at shows. This is the blank I bought online (still waiting on it) but I have the black vinyl cut out and waiting to be ironed on!  I’ve always wanted one, but custom table runners cost somewhere in the $60 – 80 range (shipped) the last time I checked, so I passed. The blank white table runner cost me around $17 including shipping. I used about $9 of black heat transfer vinyl for the table skirt because I made a few newbie mistakes.  I was using 15″ width vinyl, so I plugged that into the software, and it cut off center since the Cameo can only cut within 12″. Whoops! and then when I went to cut it again, I forgot to flip it horizontally. So I made about $5 in material cutting mistakes, which is not too bad for early projects with a new material/medium. and hey. I’m not going to make those mistakes again!
I found a local supplier for Heat Transfer Vinyl, River City Graphic Supply in Austin, TX, but it’s not for hobbyists. You’ll have to provide your Sales Tax & Use Number when you buy from them. You can also order from them online! It’s wonderful and terrible that they are so nearby! I’m eyeing their Copper from their Siser Electric line for a project, but I feel the need to work with some of the htv I have on hand first. That being said, I did pick up some hot pink flocked heat transfer vinyl from Hobby Lobby today ($2.99 for a little piece 5.5 x 9″) Â just in case I wanted to add hearts to things. You can iron on flocked heat transfer to wood & cork, too! Not just fabric.
My Silhouette Challenge buddies and I are all sharing projects on our blogs today, so peruse the projects below for a wealth of Silhouette inspiration!
I got my first custom vinyl car decal order from a friend of mine, Manue of Pretty Kiku last week. (even before I had announced that I was starting custom sign business. It was like she knew!) She wasn’t sure what size she wanted, so I sent her some mockups to give her an idea, and had her measure to see how big she would like the decal to be.
I had to make a tiny thank you card to go with it, of course!
This is a great video that shows you how to apply a decal to your car:
We decided to trade for a pair of earrings I had started eyeing at the Blue Genie Art Bazaar. She’s sending me these: Style #4. I love black and gold right now, so they are perfect! I had a hard time choosing between styles #2 and #4 because I’m really into floral motifs, but it’s the one with most gold, so I went for it. My hair is black, so I usually like to wear lighter earrings for some contrast if my hair is not up.
I had fun playing with Cami (my Silhouette Cameo) with my friend Crystal on Saturday after my heat transfer vinyl order came in this week. She picked out gold and we downloaded some vectors to cut out from the internet! I’m planning on making a one with the stare of Texas one for myself, either in gold or this awesome shimmer lime green (from the Siser electric line) I picked up the other day! Now I’m wishing I had some HTV in copper. This wish can come true pretty soon if I *really* wanted on Monday morning at 10 am, because I found a local supplier of heat transfer vinyl! (River City Graphics Supply) It’s $16 a yard for the Siser Electric line, ouch! but I wouldn’t use much to make a similar design – this was a little less than a 5×5″ design. I’m all about the metallics these days, so I’m sure it will come in handy.
I showed her how to weed the “stitch” marks in her design on the HTV. I compared weeding to using a seam ripper… especially for this project since we were weeding stitch marks in the design. We used Siser Easyweed Heat Transfer Vinyl. She decided to use her nails instead of the weeding tool and it went by quick! but we played for three hours, so uhm, I’m not sure how quick it went because it was so fun! She did play with my cats when she first stopped by, so that might have been it? Maybe?
We also forgot why she came over… partially to pick up some chairs she had lent me (the iron-on transfers we designed for our shirts were just a little way to say thank you.) So, Crystal, I have your chairs. still. ha! Don’t forget to send me a picture of the shirt you decided to iron it on to!
 After Christmas I bought a pack of battery powered lights, thinking I’d do the classic frosted/vinyled glass block craft and put that on my mantel, but I remembered I had downloaded the free shape of the week last year from the Silhouette Design Store, and decided to tackle that 3D project instead. I followed their instructions to a T and was able to assemble to Heart Marquee with success! It looks so snazzy lit up.


